After you setup your environment as described in Prerequirements , you're mostly done. Because JUnitRecord is a Maven project, setting up your project is simple.
This tutorial tries to give you a quick start by going step by step thru a very simple project.
First create a project folder (best in you workspace) and put the following pom.xml inside:
<?xml version="1.0" encoding="UTF-8"?>
<project>

	<modelVersion>4.0.0</modelVersion>
	<groupId>com.exmaple</groupId>
	<artifactId>com-example</artifactId>
	<version>1.0-SNAPSHOT</version>
	<name>An minmal Example</name>

	<repositories>
		<repository>
			<id>JUnitRecorder-repositry</id>
			<name>JUnitRecorder repositry</name>
			<url>http://junitrecorder.sourceforge.net/m2</url>
		</repository>
	</repositories>
	<dependencies>
		<dependency>
			<groupId>com.seitenbau.testing</groupId>
			<artifactId>sb-junitrecorder-core</artifactId>
			<version>1.0.0</version>
		</dependency>
	</dependencies>
</project>
Now open a console in the created project folder and execute "mvn eclipse:eclipse". Maven will now create necessary Eclipse files so that later you can import it as Eclipse project. Maven also takes care of the dependecy managment. In the pom.xml the dependency to JUnitRecorder was specified, which Maven automatically resolvees and downloads all necessary jar files.
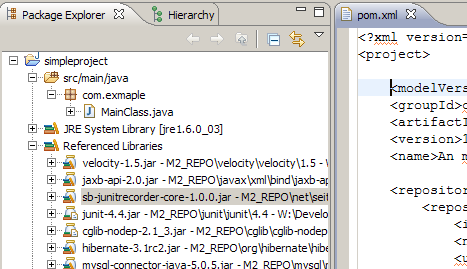
After the Maven run import into Eclipse is possible.
Goto "File\Import" and choose "General\Existing
Projects into Workspace". Now browse to the above
created project folder and you can import the
project:

As you can see Maven also added all dependency necessary for the Core Project, like Hibernate etc.
First we create a very simple Java Class with just one method:
package com.exmaple;

public class MainClass {

	public static void main(String[] args) {
		new MainClass().avg(12);
	}

	protected int avg(int value) {
		if(value>0) {
			return value;
		} else {
			return value * -1;
		}
	}

}
The source code root folder for Maven projects is "src/main/java", therefore the java code location should be: "%PROJECT_FOLDER%/src/main/java/com/example/MainClass.java"
Now generate all Artifacts that were needed for the instrumentation. To keep everything simple all files will be kept in the same project. Create a second Class which contains the following main method.
public static void main(String[] args) {
		RecorderConfiguration configuration=new RecorderConfiguration();

		MethodConfiguration methodConfiguration=new MethodConfiguration();
		methodConfiguration.setReturnType("int");
		methodConfiguration.setPackageName("com.example");
		methodConfiguration.setClassName("MainClass");
		methodConfiguration.setMethodName("avg");
		methodConfiguration.setParameters("int");

		configuration.addMethodConfiguration(methodConfiguration);

		Instrumentation.createArtifacts(configuration, "src/main/java", "src/main/resources");
}
The code is kept to the absolute minimum, just specifies which method to record and where to put the generated Artifacts.
After execution you should find a MainClassAspect.aj and a MainClass.record.xml in the project. The first one is the Aspect and the second the above configuration as XML.
After the previous step you will get some compile errors. This is because the instrumentation uses AspectJ for bytecode manipulation, but AspectJ is not active on the project.
This is the point where it is really nice, and for this tutorial required, that you have AJDT installed. You can do the instrumentation with AspectJ by adding the following XML into the pom.xml and run "mvn eclipse:eclipse". For this easy Tutorial you also can just activate AspectJ in the context menu of the project "AspectJ Tools\Convert to AspectJ Project".
<build>
	<plugins>
		<plugin>
			<groupId>org.codehaus.mojo</groupId>
			<artifactId>aspectj-maven-plugin</artifactId>
			<configuration>
				<source>1.5</source>
			</configuration>
			<dependencies></dependencies>
			<executions>
				<execution>
					<goals>
						<goal>compile</goal>
					</goals>
				</execution>
			</executions>
		</plugin>

		<plugin>
			<groupId>org.apache.maven.plugins</groupId>
			<artifactId>maven-eclipse-plugin</artifactId>
			<configuration>
				<additionalProjectnatures>
					<projectnature>
						org.eclipse.ajdt.ui.ajnature
					</projectnature>
				</additionalProjectnatures>
				<additionalBuildcommands>
					<buildcommand>
						org.eclipse.jdt.core.javabuilder
					</buildcommand>
					<buildcommand>
						org.eclipse.ajdt.core.ajbuilder
					</buildcommand>
				</additionalBuildcommands>
			</configuration>
		</plugin>
	</plugins>
</build>
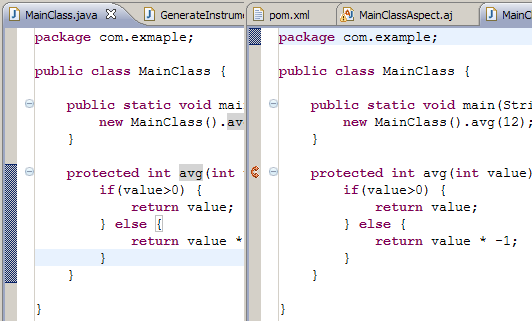
If you have activated AspectJ correctly AJDT now
shows a small Icon in front of the avg() Method.
(See image below). If you don't have compile errors,
but still don't see it, make sure the method names
entered in the configuration were correct.

Now you can just run the program. It should now automatically connect to the your (hopefully) running MySQL Database.
Because we didn't specify any repository the recorder connects to the "sbtestrecorder" Database on the localhost. With the username "root" and without a password.
There should be no difference between a normal run and the instrumented run. Only the hibernate logging output will tell you you're running the instrumented version. In our case there is no GUI so the program will start, call the method and then exit.
For Test generation it is necessary to first load the test data back from the repository. The framework is designed to be independent from the repository implementation and therefore the filtering is based on the method signature.
public static void main(String[] args) {

	// Setup repository "filter"
	MethodConfiguration methodConfiguration=new MethodConfiguration();
	methodConfiguration.setReturnType("int");
	methodConfiguration.setPackageName("com.example");
	methodConfiguration.setClassName("MainClass");
	methodConfiguration.setMethodName("avg");
	methodConfiguration.setParameters("int");

	// Retrieve test data from repository
	List<RecordedMethodConfiguration> testData
			= RepositoryService.getTestData(methodConfiguration, null);

	GeneratorDataDriven generator = new GeneratorDataDriven();
	generator.addPartGenerator( new PartGeneratorTargetCreateNewInstance() );
	generator.addPartGenerator( new PartGeneratorReturnValueAssertEquals() );

	TestConfiguration configuration=new TestConfiguration();
	configuration.setTestData( testData );

	TestGenerator.createTestArtifacts(generator, configuration, "src/test/java", "src/test/resources");
}
The data is then retrieved from the repository and passed into the TestConfiguration. The actual generation is done via a Test Generator, in this case the GeneratorDataDriven. Because we used default settings when recording we need now to specify how to create a instance of the target class. In this case a PartGeneratorTargetCreateNewInstance is used which just uses a new-operator. The second PartGeneratorReturnValueAssertEquals adds a AssertEquals for the return value.
When you run this piece of code you'll see the connect to the repository and the generation of the JUnit-test and some xml files.
To keep the tutorial small everything was kept inside one project. For bigger projects it is also possible to move the instrumentation artifacts into a jar which then is compiled into the bytecode by AspectJ. This has the advantage of much lesser impact on the target project.
As seen in this minimal tutorial the one of the next important steps is to develop a GUI-frontend. Especially when "selecting" test data for which to generate tests, the current state is not user friendly.